
Advanced – Impersonation
In this Advanced level article we’re exploring the Impersonation rule; this will include information on both how to play with impersonators, and against them. The article will include the theory behind the use of the Impersonation rule alongside worked, practical examples. If you have not already read our article on Camouflage then it might be a wise idea to do so and then come back to this one, because the Camouflage page covers many of the essential aspects of playing with marker states. This article on Impersonation is marked Advanced, whereas the Camouflage article is marked Intermediate because Impersonation is a rarer rule with a number of strange quirks, and I’m going to discuss some more advanced game techniques here.
What Is The Impersonation Rule?
Impersonation is similar to Camouflage and Infiltration but more powerful.
The most important part of Impersonation is that it is a marker state, which means that the real trooper is hidden by a marker rather than being placed on the table. Like Camouflage this means that the troop cannot be attacked until it is revealed.
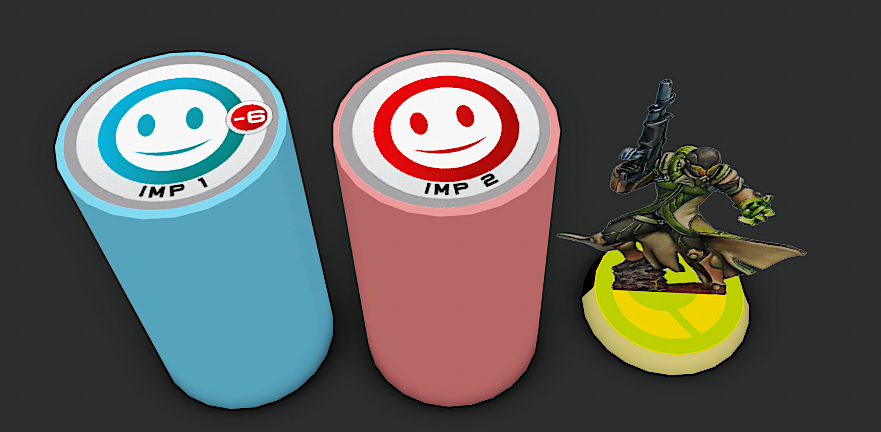
An Impersonation 1 marker, an Impersonation 2 marker, and a revealed impersonator
Another aspect of Impersonation is that the trooper can deploy anywhere outside the opponent’s Deployment Zone without any roll. That gives you almost the entire board to deploy on with no roll required. Furthermore, impersonators can deploy within the opponent’s Deployment Zone with a normal WIP roll. You can think of this as being like ‘better Infiltration’.
There are a few differences between Camouflage and Impersonation:
- There are two impersonation states – Impersonation 1 and Impersonation 2. Impersonation 1 is the superior state and is denoted as Impersonation on the army builder. We sometimes call Impersonation 1 “Full Impersonation”. Impersonation 2 is inferior and is denoted as Impersonation [IMP-2].
- When discovering a trooper with Impersonation 1, units get a -6 penalty (unless they have a Biometric Visor).
- When successfully discovered, a unit with Impersonation 1 enters the weaker Impersonation 2 state.
- When discovering a trooper with Impersonation 2, units get no penalty.
- Getting discovered from the Impersonation 2 state means you are revealed.
This means that a unit in Impersonation 1 has to be discovered twice before being revealed. - An impersonator only loses one level of Impersonation per order. If an Impersonation 1 marker is discovered 100 times in one order, it still only goes down to the Impersonation 2 state.
So it’s really difficult to Discover impersonators.
- Both Impersonation 1 and Impersonation 2 units get the deployment advantages discussed above. Camouflage units get no in-built deployment advantages.
(Killer Hackers and hackers with Hacking Devices Plus can enter the Impersonation 2 state via Cybermask. These hackers don’t get anything on deployment, neither marker state nor forward deployment.) - Impersonators are perceived as allies by the opponent’s army. Thus, unlike Camouflage markers, Impersonation markers aren’t hit by mines, cannot be “accidentally” hit by templates targeting another valid model, and cannot be targeted by Intuitive Attacks.
- Despite this, the opponent’s units cannot walk through Impersonation troopers. They are not actually allies; they’re just perceived to be.
So, compared to troopers with Camouflage and Infiltration, Impersonation 1 units:
- Start further up the field
- Are tougher to Discover
- Are harder to target with templates
- And are more resistant to enemy defences such as mines
Impersonator Profiles
As of Fall 2023, there are currently six units with Impersonation in Infinity. These units are spread across three factions – Haqqislam, Combined Army, and Tohaa – along with the Sectorials of Hassassin Bahram, Shasvastii Expeditionary Force, and Spiral Corps.
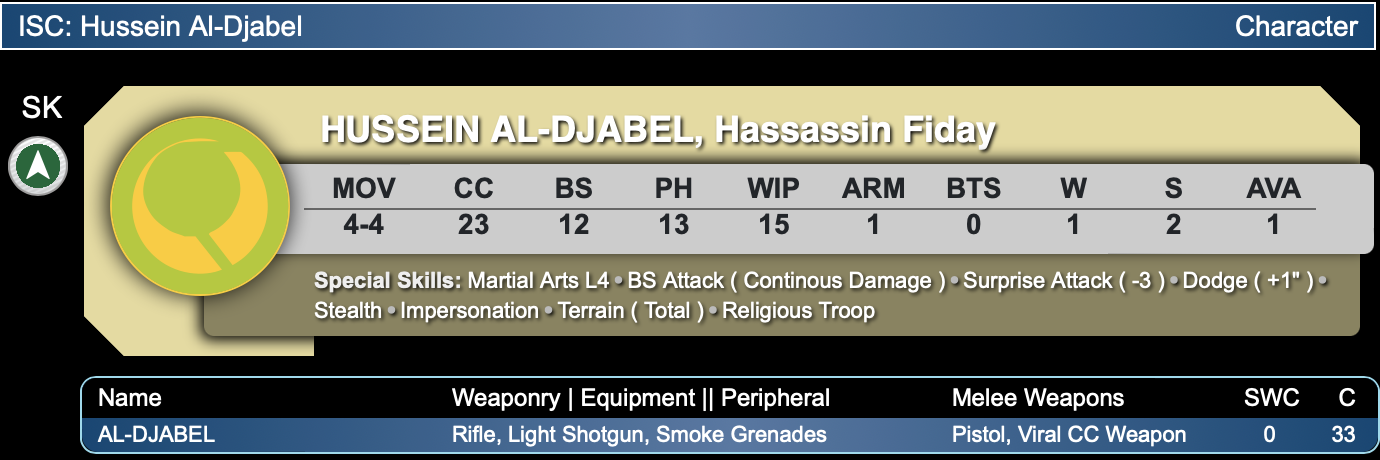
Haqqislam and Hassassin Bahram
Both Haqqislam impersonators have Impersonation 1. Both units have exceptional CC skills, Direct Template weapons for trading, and smoke grenades. The normal Fiday is mediocre in a fair gunfight, but Al Djabel hits surprisingly hard thanks to BS Attack (Continuous Damage) and a mildly higher BS. Neither is notably tough, outside of their marker state.

Combined Army
Combined Army has one full impersonator (Speculo Killer), and one [IMP-2] impersonator (Greif Operator). The Speculo is a talented close combat fighter, with mediocre shooting and poor toughness outside of its marker state. The Greif Op is cheaper thanks to their lower level of Impersonation, excels at scoring cheap kills on flashbots, warbands, and midfield Camouflage units thanks to deployment advantages, MSV1 and Breaker Pistols(+1B), but will quickly falter if engagements aren’t chosen carefully. Also note that the Greif Op has D-Charges, in case a mission or classified requires them.
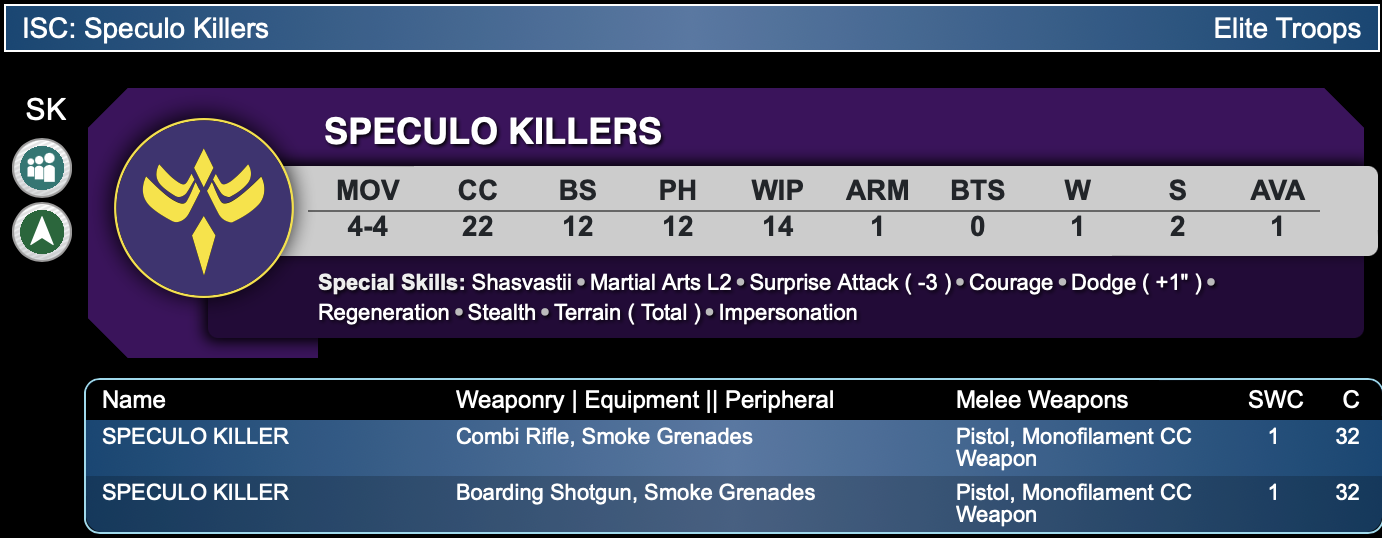

Shasvastii Expeditionary Force
SEF gets access to a unique Minelayer profile for the Speculo Killers, allowing potentially two Impersonators and their mines to be withheld via a Command Token and placed right next to the enemy Deployment Zone. Some consider these profiles to be a primary reason to play SEF instead of vanilla.

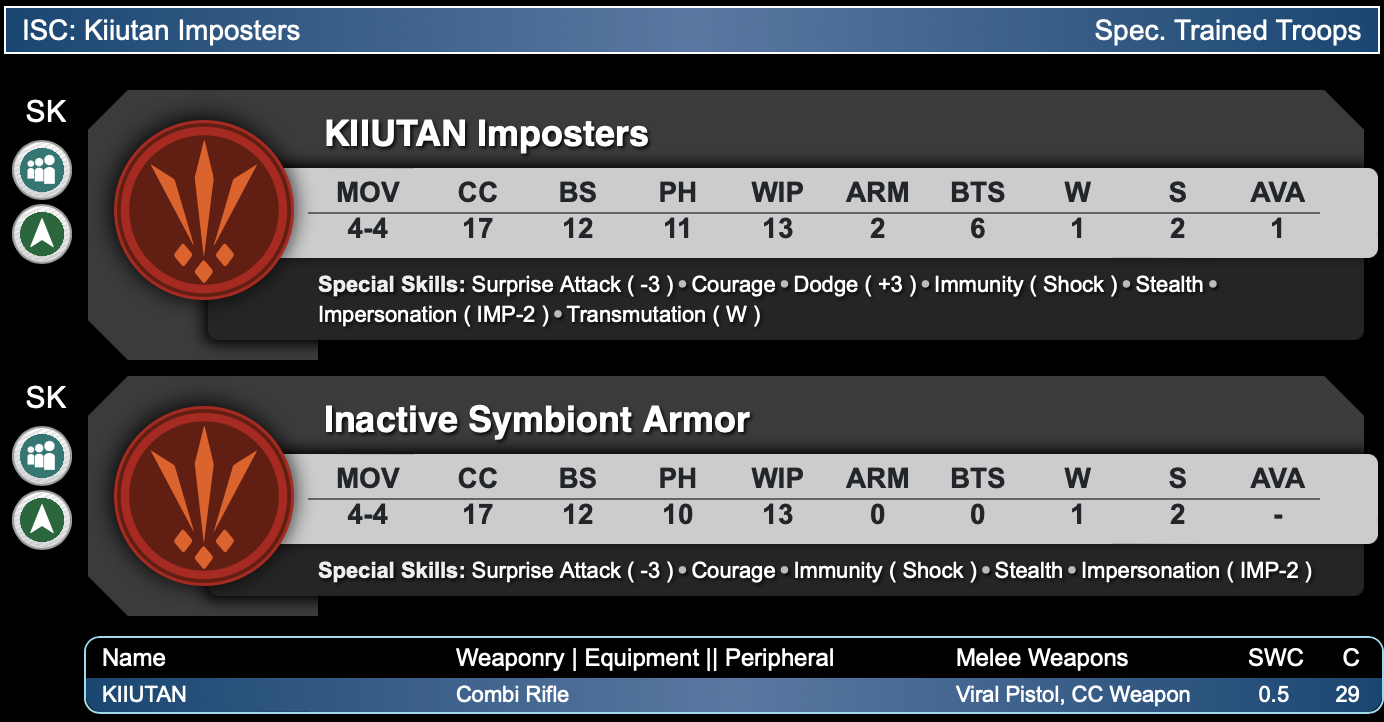
Tohaa and Spiral Corps
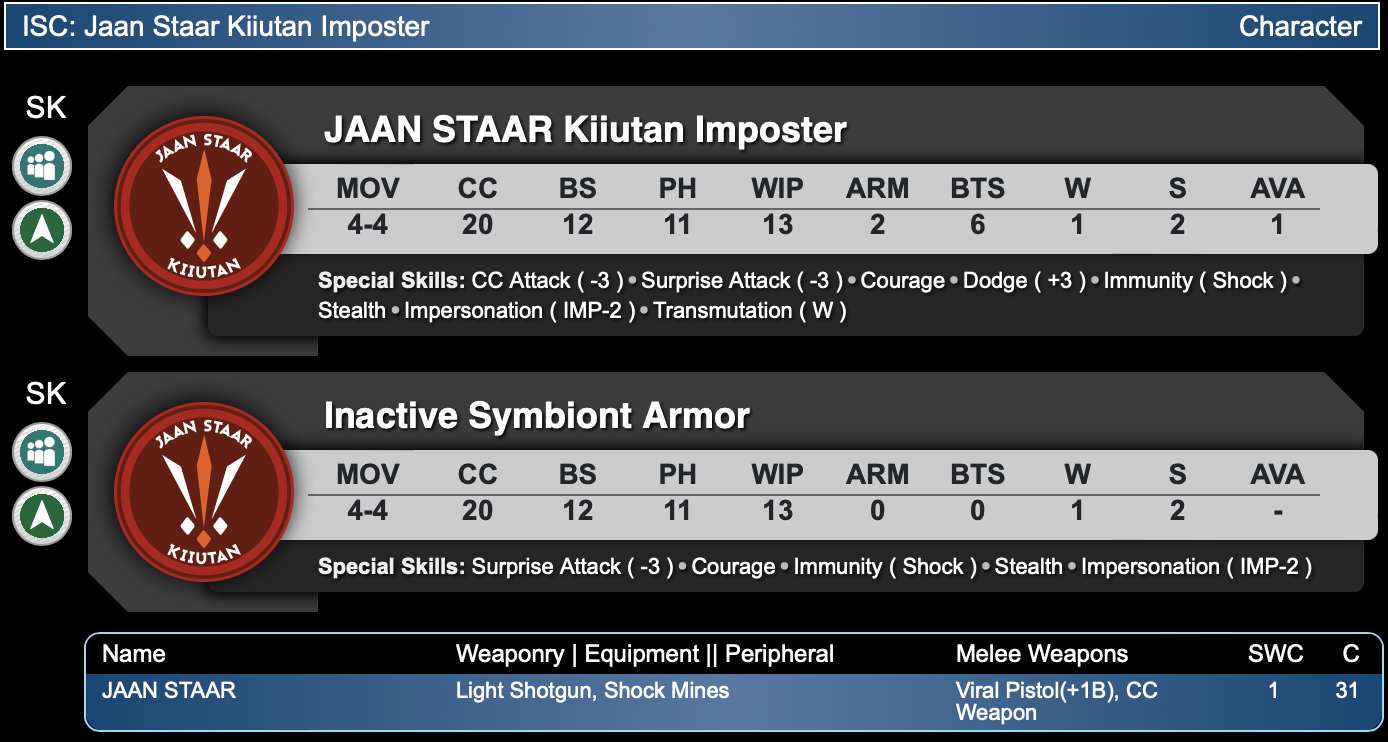
Tohaa and Spiral Corps have three impersonators, all with the inferior [IMP-2]: the Greif Op shared with CA, the Kiiutan Imposter, and Jaan Starr. Both Jaan and the Kiiutan can shoot fairly dangerously with viral pistols, and Jaan Starr can hold his own in CC thanks to CC Attack (-3) and Viral Pistols (+1B). However, the real strength of these impersonators is the Transmutation rule, which essentially gives two wounds and lets SymbioMates and SymbioBombs be assigned to them. These Tohaa-specific advantages make Jaan Starr one of the most feared units for his cost, but also mean his playstyle is very different from other impersonators and beyond the scope of this article. Kiiutan are comparatively rare, since they share AVA with Jaan, but are sometimes taken alongside Jaan in Spiral Corps.
Playing With impersonators in the Active Turn
For the rest of this article I focus on full Impersonators (Fidays, Al Djabel, and Speculo), not the profiles with Impersonation [IMP-2] (Greif, Kiiutan, and Jaan Staar). Many concepts apply to all impersonators, but a lot of what I say leverages the two levels of impersonation state that are only available to full Impersonators.
Freedom of Movement
None of the Impersonation profiles above are traditional brawlers. None have mimetism or high-burst guns. They lack armour and multiple wounds (and, in Tohaa, only via Tohaa-specific abilities). Where they excel is positioning and close-range lethality, especially in close combat. So, when using impersonators, the general rule is to leverage templates and CC when attacking, and rely on marker states when defending.
You might ask: if they’ll win no prizes in ARO, and their best use in the active turn is typically close combat, why is Impersonation sometimes derided as the most powerful rule in the game? Freedom of movement. Impersonators are unmatched in how efficiently and how reliably they can get to exactly where they need to be. Impersonation gives two huge advantages for active-turn movement. First, you deploy on the edge of the enemy’s Deployment Zone. Second, you get two full orders (16 inches) of movement before anyone can hurt you, because you need to be discovered twice before you are revealed.
See the following example for a demonstration of freedom of movement:

In the above image we can see our Impersonation 1 marker on the edge of the enemy Deployment Zone (blue marker on left). After spending one order it has finished a move-move order, and is now 8” inside the enemy Deployment Zone. It has been Discovered a number of times and is therefore now an Impersonation 2 marker (red marker in the centre). After spending a second order it has finished another move-move and has travelled 8” again. It has been Discovered a number of times again, and is now revealed (the Fiday with the green base near the top right corner of the image).
In the above image, a single Impersonation troop has moved a total of 16” into the enemy Deployment Zone completely freely – without the enemy being able to shoot them. It has done this with just two orders. And after spending a third order it could move another 4” (giving it a total movement of 20” across the three orders), before walking into silhouette contact with that Fusilier in the top-right corner of the image and killing it with a CC Attack. Let’s reiterate this so it’s absolutely clear – the impersonator has moved 16” before being revealed. It has moved 16” before the enemy can even target them with attacks. Once revealed it can move another 4” and suicide itself by hitting something in melee, but dying to incoming AROs. Alternatively, if it’s in a safe position at the end of that 16” movement it could spend a whole order to re-enter the Impersonation 1 state and then start again.
Freedom of movement is important because it enables the next feature – assassination.
Close Combat Assassination
The ability for impersonators to assassinate targets in the enemy Deployment Zone is unparalleled. Anything your opponent has with a single wound is easy prey. With multiple impersonator profiles, such as those with Double Action or Viral Close Combat Weapons, you have a decent chance of instantly killing units with multiple wounds. Impersonators are the undisputed royalty of surgical strikes. If you want a specific target dead then an impersonator has a very good shot of making it so. Simply use its freedom of movement to get closer and closer, safe in the knowledge that the enemy must Discover you multiple times before they can target you.
Assassination of important enemy troops is one of the most potent uses of freedom of movement. For example, if your opponent is playing Panoceania and they declare their Lieutenant’s willpower as 12 during the initiative roll, then you might choose to use your impersonator’s freedom of movement to go and kill the lone Fusilier in their Deployment Zone (which is likely their Lieutenant). Alternatively, if your opponent is playing Nomads and they have lots of Repeaters and a guided missile launcher, then you might choose to use your impersonator to kill their hacker. Or, if a mission requires each player to elect some kind of special troop that scores extra points (such as the Master Breacher in Cryogenics from ITS season 14), then your impersonator can go and kill that troop to deny your opponent lots of points. Impersonators do a fantastic job of killing very specific targets.
Picking a target for assassination can be incredibly hard, but I would recommend the following considerations:
- A fragile but powerful gunfighter (e.g. something with a scary weapon, but only 1W)
- An obvious Lieutenant
- A mission-critical specialist or troop (e.g. Master Breacher in ITS14 Cryogenics, or a Doctor in Supplies)
The target you choose depends on the list you are running and the mission. For example, some people field Haqqislam lists with weak long-range gunfighting. This means that strong ARO pieces with long-range weapons can be a problem for the faction. Examples include Atalanta (she has BS15, MSV2, a multi-sniper, Total Reaction, and marksmanship, but only 1W). Without any way to handle Atalanta, the Haqqislam player might struggle. But of course this issue is easily solved by an impersonator assassinating her. When it comes to missions, it can be worth thinking about how you can use your impersonator to stop your opponent from scoring. In the past I have won missions that depend on specialists simply by using my impersonator to kill my opponent’s specialists. This play might not seem as intuitive as killing a scary gunfighter but your opponent’s list quickly becomes irrelevant if they have no way to actually win the game.
In the below series of images we see a strong ARO piece with a commanding view of a firelane. An impersonator is placed nearby, and proceeds to assassinate the unit in CC. Notice how the Impersonation marker drops levels at the end of each order due to enemy Discover rolls. It goes from Impersonation 1 (blue marker), to Impersonation 2 (red marker), and then is finally revealed (as a Fiday). But by the time this happens, it is in position to strike. This is an example of using freedom of movement to assassinate a target.

Picture 1: Kamau Sniper overlooks the board.

Picture 2: Friday uses its freedom of movement to assassinate the Kamau.
One of the problems with assassination is that entering CC with virtually anything in the enemy Deployment Zone can sometimes be suicidal. After all, being in base contact with an enemy troop means that your impersonator will reveal themselves. This means they can be shot! Walking into silhouette contact with an enemy that has a template weapon most likely results in your impersonator being auto-hit by that template and dying. Therefore, assassination is very strong, but can also be risky. Thankfully there are ways to mitigate this risk.
All of the full impersonators at the time of writing have smoke grenades. Smoke grenades create zones that cannot be shot through without MSV – this limits the enemy’s BS Attack AROs. Simply throw a smoke grenade to cover any AROs then use the smoke to walk up to your target without them being able to shoot. However, be aware that covering enemies with a smoke template will give them a Dodge ARO. This might be problematic if the opposing model can Dodge a long distance, such as 3” or 4”, because they could Dodge away from the smoke. In this case, a safer play is to land smoke near to the target, but not on top of them. See the below examples.
Example 1: Fiday (Impersonation unit) throws smoke which affects the Shang Ji. The Shang Ji takes a Dodge, and manages to leave the area.

Picture 1: A Fiday throws smoke on top of a Shang Ji, which successfully dodges.
Example 2: The Fiday (Impersonation unit) throws smoke so that it does not touch the enemy Shang Ji. The Shang Ji does not get a Dodge because it has not been affected by a template (imagine the Shang Ji does not get a Zone of Control ARO here). The Fiday can then safely use Stealth to walk up to the Shang Ji without provoking a Dodge ARO.

Picture 2: The Fiday throws smoke near the Shang Ji, preventing a Dodge. The Fiday then reaches close combat safely.
One of the skills of playing impersonators is knowing when it’s important to go for a suicidal attack on a key target, and when it’s better to play more safely. The smoke grenade example means that the Fiday is less likely to die, because enemy BS Attack AROs are blocked. But it takes more orders. Assassinating without bothering with smoke will take fewer orders, but probably result in your impersonator dying. As a general rule I would suggest that playing more safely with impersonators is desirable, because by keeping them alive they become a troop your opponent needs to keep worrying about throughout the game. But, if your critical target is very well protected and there’s no way to feasibly kill it without dying, then it can be desirable to save the orders and go for a suicidal attack.
Back-Arc Shooting
One of my favourite plays with impersonators is back-arc shooting. This strategy relies on using the impersonator’s freedom of movement to position yourself behind enemy models and then simply shooting them in the back. This is safer than assassinating a unit in close combat because you do not allow any AROs (except perhaps a Zone of Control Dodge), but it is often less order efficient because impersonators tend to have mediocre BS Attack abilities.
In the example below we can see a mess of enemy troops. A core fireteam with lots of characters and multi-wound units, and a remote with a Flash Pulse. Reaching any of them in close combat safely will be difficult. Instead we can try to shoot them in the back. In the second, third, and fourth images we see the impersonator move behind the team, take out the remote, and then kill the only member of the team who is facing backwards (Avicenna). This is a much safer play because we’re avoiding the front arcs of as many enemies as possible.

Picture 1: A strong fireteam and a Flash Pulse remote guard a Deployment Zone.
Picture 2: An impersonator moves from the edge of the Deployment Zone to hide behind a container. It tries to stay out of the Line of Fire of as many troops as possible.

Picture 3: The Fiday reveals and shoots the Flash Pulse remote – killing it. The Fiday reveals behind the big red crate, to avoid being seen by the Jaguar (which has an auto-hitting template weapon). Had the Fiday revealed around the side of the crate, then a successful Dodge from the Jaguar might have resulted in it gaining Line of Fire – putting the Fiday in danger.

Picture 4: The Fiday carefully pops in and out of cover, to draw Line of Fire to Avicenna. The other members of the fireteam do not have Line of Fire. This is a tricky face-to-face roll. The Fiday has 3 dice on 14s, and Avicenna has 2 dice on 12s. Thankfully the Fiday wins and Avicenna goes down. The opposing player can use the Alert rule to turn the other members of the fireteam around to face the Fiday. But it is too late – the Fiday has already managed to safely remove one member, and can now start picking off the others from a strong position.
What we’re trying to do with this manoeuvre is break a complicated defence down into manageable chunks. Had the impersonator attacked the fireteam directly, it would have taken many AROs and probably died. Therefore the better play was to move behind the fireteam and try to achieve a position in which it is behind most of them. From this strong position, the impersonator can carefully pick at the enemy troops one at a time.
Template Forking
In competitive Infinity we often talk about forks or forking. This simply refers to any situation in which the defender has a difficult choice to make between two or more bad ARO options. A hard fork is one in which both of the defender’s choices can be completely countered by the attacker. A soft fork is where both of the defender’s choices are bad, but not completely countered.
Let’s give an example of forks. In the below image there’s a hard fork, and a soft fork demonstrated.

Picture 1: A Bandit Hacker moves behind a Riot Grrl, without using Stealth. The Riot Grrl faces a fork here. They cannot shoot because they do not have Line of Fire. If the Grrl Dodges then the Bandit can hack them and the Dodge is pointless. If they Reset then the Bandit can shoot them and the Reset is pointless. This is an example of a hard fork. No matter what the Riot Grrl does, the Bandit gets an unopposed attack.

Picture 2: A Fiday moves around a sign to draw Line of Fire to a Riot Grrl. If the Riot Grrl shoots then the Fiday can choose to oppose the shots, or to simply put two Light Shotgun templates into the Riot Grrl, which will auto-hit. If the Riot Grrl dodges then they will oppose the Fiday’s shots or templates, but stand no chance of hurting it. This is an example of a soft fork. What the Riot Grrl chooses does matter, but both choices have serious problems.
Defensive Tip: The correct decision in the above situation depends on the troop being targeted by the Impersonator. With a tough troop it is usually to put a Direct Template into the Fiday to guarantee a hit, and then hope your multiple wounds allow you to take the return fire without dying. With a weak but important troop it is probably best to Dodge, because most Impersonators are not that good at shooting, so you have a reasonable chance of surviving and wasting their orders. With a completely disposable troop it is almost certainly a good idea to place a Direct Template just to threaten the Impersonator and accept a trade (both troops likely go unconscious/die).
Forks apply to impersonators with templates. Impersonators can use their freedom of movement to approach key targets (perhaps a fireteam) and then force very difficult decisions. As I highlighted above – if the fireteam dodges then they oppose the impersonator but stand no chance of killing it. If they shoot the impersonator then they might kill it, but subsequently be caught by auto-hitting templates. In both cases the impersonator is happy.
NOTE: For forks to work the enemy cannot be allowed to declare that they will Delay their ARO. If the enemy is allowed to Delay then they get to declare their ARO after you’ve said what your impersonator is doing with their second skill (i.e. whether you are using your template or shooting directly). By having perfect information, the defender’s difficult decision becomes much easier. As an impersonator player you can stop this happening. Enemies can only declare a Delay vs markers. So if you want to create a fork situation you might choose to purposefully drop your marker state either by dodging in the order before you shoot, or by declaring a useless Discover vs any enemy Troop before you shoot. (You are allowed to declare Discover versus ANY enemy, not just markers). Sometimes dropping your marker state is extremely helpful because it prevents the enemy from using Delay.
Let’s have a look at an example of a fork in action.

Picture 1: We have the same strong fireteam we saw before.

Picture 2: This time our impersonator moves directly at the enemy, and puts itself in a position where it can land a template over multiple members.

Picture 3: The impersonator declares a Discover vs the Riot Grrl to reveal itself. This means the enemy fireteam cannot Delay. Now the fireteam is in a difficult position because the members all have to declare the same ARO, or leave the fireteam if they declare a different one. If the fireteam shoots then the impersonator might die, but will auto-hit them with a template. If the fireteam dodges then the impersonator will not die, but they might not die either. This is a soft fork because both choices are problematic.
Defensive tip: In reality the correct decision above is probably to Dodge with important or weak members of the fireteam, and then have one or two tougher (or not important) members put Direct Template weapons into the Fiday to guarantee hits. The fireteam can be reformed with a command token later, and it is important to clear the Impersonator as quickly as possible.
Re-Impersonating
One final thing to remember is that a revealed impersonator can re-enter the Impersonation state by spending a whole order whilst outside the Line of Fire of enemies. Once you have finished attacking with an impersonator I would highly recommend doing this in order to maximise your troop’s chance of survival. An alive impersonator demands respect. A dead impersonator does not.
Playing With Impersonators in the Reactive Turn
Impersonators are almost never going to be used as ARO pieces in the reactive turn because they are not defensively strong troops. The reason that I say this is because all of the troops that are currently in the game with ‘full Impersonation’ have no mimetism, one wound, and one armour. This means that once they are revealed they are going to die very quickly. Rather than focusing on causing damage with your impersonator in the reactive turn, your goal is solely to keep them alive for as long as possible. You can achieve this most easily if you keep them in their marker state for as long as possible. Of course this is much easier if you position your impersonator in a sensible space.
Positioning
Positioning an impersonator is a balancing act. An impersonator that starts too far back will be unable to efficiently use its close combat skills. However, an impersonator that starts too far forward will be easy for your opponent to move towards and kill. We want to find a position where it is difficult for our opponent to reach us, but easy for our impersonator to reach them. I would suggest that if your opponent is taking the first turn then it is usually better to be slightly more careful with your impersonator placement, because you know that your opponent is going to have many orders to spend in trying to remove them. Having said this, one thing I personally like to do on some occasions is actually make the impersonator an attractive target for the opponent. The reason I do this is because Impersonation 1 markers are discovered with a -6 penalty to WIP. If you combine this with multiple orders spent reaching the impersonator we can sometimes see opponents spending four, five, six, or more orders just dealing with one of your troops. This is actually a fantastic exchange. So baiting your opponent into doing this can be a viable strategy.
Let’s think about impersonator placement with some examples.

Picture 1: An example opposing force. Note the TAG in the middle of the board. The Remote with Total Reaction on the left. The close combat specialists on the right. And the two skirmishers – one in the centre and one on the left.

Picture 2: Potential impersonator spots.
1: A trap position. Whilst it is close to the enemy hacker (who could be a great target), it is just one or two orders worth of movement away from the opponent’s close combat specialists. This position is a fantastic aggressive spot, but an awful defensive one because the opponent has a counter to the impersonator extremely nearby.
2: A poor position. This suffers from many of the same issues as position 1, but might also be in Line of Fire of the middle skirmisher.
3: A moderate to good position. Whilst the position appears reasonably far from the enemy Deployment Zone it is actually only about 24” from some good targets in the rear corner – which can be traversed in 3 orders. However, this consequently means that the enemy CC specialist in the top left of the image can also reach you in approximately 3 orders too. Having said this, due to your impersonator’s marker state and the fact that you can strip some of your opponent’s orders on turn 1, you require a heavy investment for the CC specialist to reach you. Let’s imagine the opponent has 9 orders because you only strip 1 with a command token due to their Counter-Intelligence ability. Does the opponent want to spend 3 of their 9 group 1 orders just moving over to your impersonator, then another 2 to Discover? Perhaps they do. But you can hope that it’s costing them approximately half of their main order pool. Finally, because this position is in the middle of the board, you can cover your impersonator with an allied minelayer or some other ARO piece to protect it. If this is done then the position is very solid.
4: A poor position. Whilst this spot is reasonably safe from the enemy close combat specialist, due to its central position, it is right next to an enemy skirmisher with a koala. This means they can start to declare Discovers against you without having to spend any orders moving – not good!
5: A poor to moderate position. This is an extremely safe position that the opponent is going to struggle to reach quickly. And it is in the midboard so it is a position you can cover with allied AROs. However, it does not put you within striking distance of any reasonable targets (the only troop nearby is a skirmisher with a koala – something your impersonator will die to if you reveal it). Therefore whilst this position might help your impersonator survive, it will potentially just take your impersonator out of the fight. So perhaps not a good position. However, if the mission depends on interacting with things in the midboard and you know that the opponent has to come closer to you to win, then it could be a reasonable position.
6: A poor position. Close to the enemy skirmisher with koala. Better than position 4, but still not good.
7: Poor to moderate position. As with position 5 this is an extremely safe spot, but it might be so safe that your impersonator does not end up contributing. However, if the enemy must go to the midboard to win the game then it might be viable.
8: Poor position. Whilst this position is very safe, it is tucked away in one corner so it presents very poor opportunities for your impersonator to attack your opponent. If your impersonator survives and moves towards the enemy Deployment Zone, it will find itself close to a skirmisher, a Total Reaction REM with a 360 visor and lots of other nasty troops. Not recommended.
9: Poor position. Close to both an enemy skirmisher with a koala, and an enemy warband. It’s also too far from many viable target to really be worth placing in such a compromised position.
Defensive Tip: Notice that placement positions for an Impersonator are attractive if they are close to an important target, but unattractive if they require revealing near to a troop with a Direct Template or deployable. Remember that deployables will not detonate on an impersonator in their marker state, but they will if the troop reveals itself. You can therefore make deployment of an impersonator extremely difficult if you place deployables, close combat specialists, and troops with Direct Templates next to your important models.
ARO Declaration
ARO declarations with Impersonators are extremely context sensitive, so I can only give broad guidelines, not definitive rules.
If you want your Impersonator to survive for as long as possible then it is best to maintain their marker state. If your opponent declares a Discover versus your Impersonation 1 marker, you declare no ARO. If they pass the Discover then you drop down to an Impersonation 2 marker, and that’s it. You’re not in any danger. If you had dodged or shot you would have revealed yourself immediately, which is a bad idea for survival!
Once your impersonator is an Impersonation 2 marker, your decisions become difficult. Discover + Shoot is a legal skill combination versus an Impersonation 2 marker, which means that if the opponent declares Discover as their first skill, they could shoot you with their second skill (if the Discover passes). You have multiple possible choices:
- It might be best to reveal your impersonator and try to hit the enemy troop with a Direct Template weapon. Your impersonator is likely to die but it guarantees damage to the enemy. Sometimes a one-for-one trade is good.
- If your impersonator has Antipersonnel Mines and is in an advantageous position then placing a mine as your ARO can be fantastic. The reason for this is that the opponent might then need to spend even more orders removing the mine. Wasting your opponent’s orders is very important! Again, the impersonator is likely to die in this situation.
- If the opposing troop has low willpower but high BS and you’re desperate for your impersonator to survive then you might want to consider declaring no ARO, but this is a real risk. The reason for this is because the opposing troop might fail the Discover.
- If the opposing troop has high willpower but low BS or a weak weapon and you’re desperate for your impersonator to survive then you might want to consider throwing a smoke grenade with your ARO. As above – this is risky!
If at any point the enemy declares Move as their first skill then it is impossible for them to shoot your impersonator in that same order unless you reveal yourself. Because you cannot Move + Discover + Shoot in one single order. In this instance I would strongly suggest declaring no ARO. In fact, this is a general rule I would put forward for most marker state units: if your opponent declares Move with their first skill then it means they cannot shoot your marker in the same order, and you should therefore declare no ARO because you are not in immediate danger. This rule does not always hold true, but it’s mostly good advice.
If your opponent moves multiple troops in front of your impersonator (e.g. a fireteam) then I would consider revealing and placing a Direct Template. This is true regardless of whether you’re an Impersonation 1 marker, or an Impersonation 2 marker. In some situations, covering multiple troops with a shotgun template is just too good to pass up.
Playing Against Impersonators in the Active Turn
Discovery and Positioning
As you may have gathered from the above text, impersonators want to waste your orders through their multiple marker states, and perhaps place a Direct Template over your troops just before they die. As the player trying to efficiently deal with impersonators you want to counter both of these strategies.
There is nothing more heartbreaking than moving a troop over to an impersonator and then failing your Discover roll. This necessitates more orders spent moving a second troop, which can quickly become order intensive. To avoid this situation occurring, the best way to Discover impersonators is to use troops that get to make multiple rolls simultaneously. Synchronised peripherals, servant peripherals, and coordinated orders give you this ability. For example, a doctor and servant remote could both declare a Discover versus an impersonator giving you two rolls, instead of one. This raises your chance of success. Synchronised units and coordinated orders work similarly.
Whilst discovering, try to do so from outside of 8.5” if you are desperate for the troop to survive. The small Direct Template is about 8.3” long, so being within this range puts your discovering troop in danger. You’ll want to balance this with the +3 mod you get for discovering within 8”. You may want to place something disposable like a servant remote within 8” and the valuable troop itself outside of 8”. This way you get the additional +3 mod, but do not risk anything too important. If you suspect that the impersonator has mines then the safe distance is roughly 9.5” because the mine itself is 1” long, and the template extends 8.3” from there. Of course if the troop(s) you Discover with are entirely disposable then this is not important.
Impersonator Tip: If you want to ensure the opportunity to place a template on any incoming attackers, try to find a deployment position where the impersonator cannot be seen from outside 8”. This way any attacker will have to declare Discover from within template range.
Playing Against Impersonators in the Reactive Turn
Bodyblock with throwaway units or markers
One of the advantages of Impersonation is freedom of movement. Impersonators want to use movement to reach the best targets. Therefore one of the most effective ways to limit the abilities of an impersonator is to trap or block them!
Trapping impersonators during deployment is the most effective strategy to limit their potential, however this is quite difficult to do. Impersonators are most likely to be your opponent’s reserve model, which means they’ll be placed last. It is therefore not possible to entirely trap an impersonator unless you deploy second. If you do then you may want to consider reserving a profile with forward deployment and multiple models, for example a Minelayer or unit with Decoy. With two models you can trap an impersonator against a wall. With three models you can trap an impersonator in the open.

Picture 1: In this image an impersonator is trapped by two Camouflage markers. It cannot walk through them because they are enemies. It cannot enter silhouette contact with them because you are not allowed to do this with enemy Camouflage markers. It is therefore stuck.
Blocking an impersonator but not trapping them is much easier. This simply consists of placing units in such a way that an impersonator will struggle to reach your important targets. Here are some ideas:
- A unit prone on the edge of a building next to a ladder will prevent an impersonator climbing that ladder. You can also achieve this with a Mine. In the below image, note that the impersonator cannot climb that ladder to enter close combat with the sniper, because the Camouflage marker blocks its path. If it wants to Discover the Camouflage marker it has to reveal to do so – at which point it becomes very vulnerable!

- Units prone in the middle of doorways will be difficult to see through windows but can stop an impersonator walking through the door. In the first image below, notice how the impersonator cannot use the door because it is trapped by the enemy Camouflage marker. In the second image below, the impersonator cannot access the fireteam at the top of the building without first revealing and killing the troop that blocks its path.


- Units that block the path to other models will prevent an impersonator reaching close combat, but may present an opportunity for them to place templates that hit multiple troops. In the below image, the impersonator cannot enter close combat with the TAG because a model blocks its path.

Defensive tip: If you want to block the path of an impersonator, consider using a model with a marker state, multiple wounds, or two unconscious states (e.g. a remote with Remote Presence). Using a weak, single wound model, without a marker state might invite trouble because the impersonator could just kill it from range, then re-enter the Impersonation state and keep going. Remotes with Remote Presence are good here because they’re cheap and expendable but have two levels of Unconscious. This means that an impersonator has to do three wounds to them before they stop blocking the path.
Defensive tip: If you want to protect a model from an impersonator during deployment, you can either deploy it immediately in the main deployment step and place other models to block the impersonator’s path (as seen above), or, if you are deploying second, you can wait for your opponent to place the impersonator as their reserve model, and then you place your important model as your reserve, as far away from the impersonator as possible.
Dodge your warbands to follow the impersonator
If impersonators want to move through your Deployment Zone to reach important targets then it’s important to ensure you have units that maintain vision of them. The easiest way to do this is to declare Dodge AROs with cheap warband type units as the impersonator activates. The impersonator is unlikely to want to reveal to shoot a disposable warband, so the Dodge should be unopposed. With high PH scores and bonuses to Dodge distance, a warband should be able to follow an impersonator around as it moves. It is important that the unit you choose has a Direct Template weapon so that as soon as the impersonator reveals you can guarantee an instant hit.

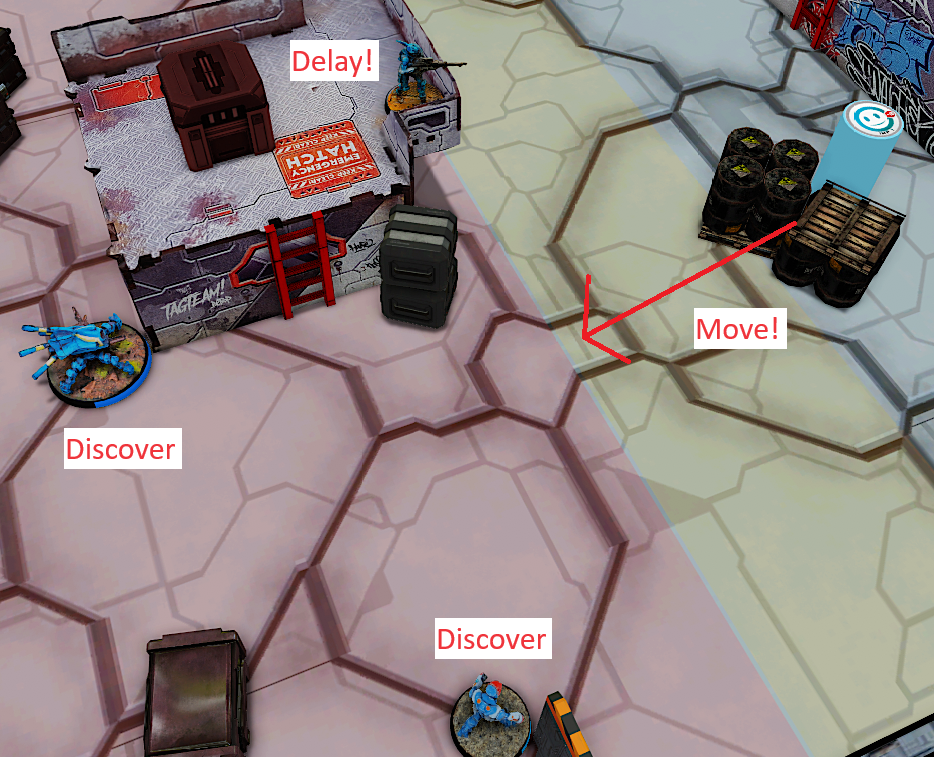
In the above image we can see that the SAS will declare Dodge in order to follow the impersonator as it moves. The SAS has a chain rifle, so as long as it stays no more than about 10” away from the impersonator it can template it as soon as it reveals.
Discover with throwaway or cheap units
We want to Discover impersonators before they reach our most valuable troops. However, the problem with declaring Discover is that the impersonator might simply reveal and choose to shoot our unit that does the discovering. Therefore it’s very important to only declare Discover if you’re confident that the impersonator cannot pose a threat to you with its ranged weapon (for example, if it is over 16” away, and you’re in cover and have mimetism), or if the troop in question is disposable.
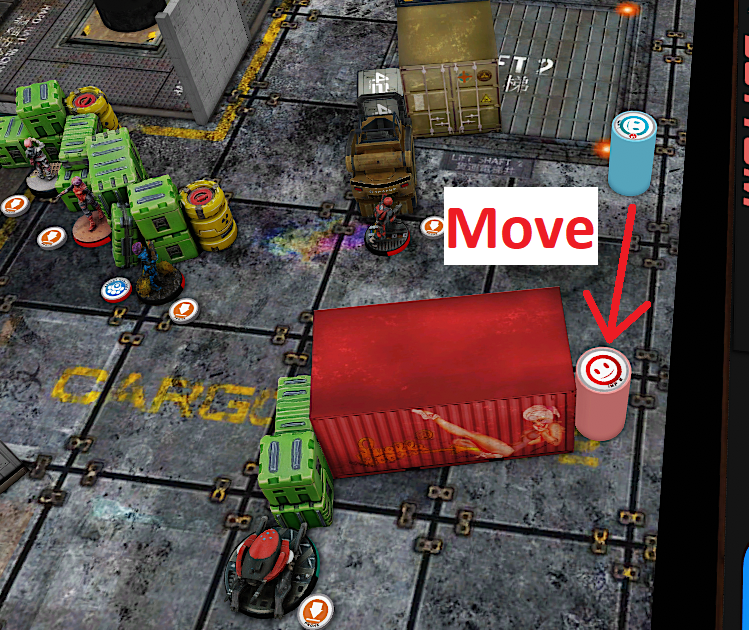
In this image we can see that an impersonator has managed to get very close to our sniper. We want to make sure that the sniper can oppose the impersonator if it chooses to reveal and shoot, and therefore we choose to delay with it. The nearby remotes are not important parts of our list, so we choose to Discover with them. If the impersonator reveals to shoot the remotes, we don’t really care because they’re expendable, and the sniper will also get the chance to shoot. If the impersonator merely moves, we have two models that can try to reveal it.
Break your fireteam to have some Shoot and some Dodge
If the worst happens and an impersonator does get close to a fireteam, it can be a good idea to have some troopers declare Dodge, and others declare Shoot (BS Attack). This will mean that some troops leave the fireteam, but it potentially maximises the chance of survival.

In this image we have an impersonator that has revealed and is about to attack the fireteam. We really want our paramedic (bottom left) to survive, so we choose to Dodge. This means that regardless of whether the impersonator uses a template or shoots us conventionally, we still get a meaningful response. The sniper and the other fireteam member can be sacrificed as long as the impersonator dies and our paramedic survives. So they choose to shoot. The fireteam is reduced to just two members, but we have maximised our chances of removing the impersonator and keeping an important member of the team alive. If the paramedic does survive it can then simply heal any members that go unconscious.
Mark your important models with templates
Some models are very important to our list and might be vulnerable to impersonators. They might lack templates which means they cannot threaten to instantly kill an impersonator when they reveal. Some models do not have sufficient toughness to scare impersonators away. In these cases, we can use our other troops to provide the defence that these models are lacking. We do this by placing them close together. It does increase the risk that both models get hit by a template together, but it is much easier to survive a template than it is to survive an impersonator’s close combat.

In this image we see a Puppet Master on the left, prone, and a Morlock on the right, prone. Puppet Masters are great targets for impersonators because they have low CC scores, low PH, and no template weapons. Under normal circumstances the impersonator could remove the Puppet Master without feeling threatened. However the nearby Morlock has a Chain Rifle, and will therefore instantly hit the impersonator if it reveals. In this situation the impersonator can still kill the Puppet Master, but it probably dies in return. The impersonator could try to throw smoke to block the Line of Fire of the Morlock, meaning that it cannot use its template. But then of course this will take further orders.
An Example Deployment
Let’s put all these tips and tricks together with an example deployment, so that we can see what it might look like in a game.

The impersonator is deployed behind the wall, just outside of the Deployment Zone.
We will discuss the role of each of our deployed troops, following the numbers in the image.
- This is a remote with Total Reaction and a 360 visor. If the impersonator tries to move to the left and push into the back of the Deployment Zone, this remote will see and take shots.
- This is a Mine. If the impersonator reveals to kill the Puppet Master (number 3), the Mine will trigger.
- This is a Puppet Master. It is a vulnerable target so we have protected it with a remote that has Total Reaction (1), a Mine (2), a Morlock (4), and a Crazy Koala (5)
- This is a Morlock with a template. If the impersonator tries to kill the Puppet Master, the Morlock can put a template into it, guaranteeing a hit.
- This is a Crazy Koala. These pieces of equipment run at any enemy that activates within 8”, so long as they are not a marker. If the impersonator reveals to kill anything in this area of the Deployment Zone, it will trigger.
- This is a Moran, with a Repeater and Shotgun. If the impersonator reveals anywhere within 8” and breaks Stealth then hackers will be able to use the Moran’s Repeater to Spotlight the impersonator. If the impersonator tries to kill the Moran, it will get templated.
- This is a servant remote that goes with an engineer. This is a sacrificial remote which we can use to declare Discover if the impersonator moves into the Deployment Zone.
- This is a Liberto. It is bodyblocking the impersonator and forcing it to move around instead of directly into the Deployment Zone. It also dodges on 16s, so will follow the impersonator as it moves.
- This is a mine, deployed by the Liberto. It is bodyblocking the impersonator.
- This is a Morlock with a template. It is cheap and disposable so we can use it to Discover if we do not care about it. If the impersonator starts walking straight towards our vulnerable Guided Missile Launcher (12), we can declare a Dodge with the Morlock to block its path, which will stop this play.
- This is a Puppet Bot. It has 2 STR and a template, so it will threaten the impersonator as it moves into the Deployment Zone and will be tough to kill. It mildly blocks the way to our Guided Missile Launcher (12).
- This is a Guided Missile Launcher. It is a very vulnerable piece. We have covered it with a Puppet Bot (11), and a Crazy Koala (5). The nearby Morlock (10) can Dodge after the impersonator if it moves towards the Guided Missile Launcher.
- This is another Puppet Bot. Like the other one, it is quite tough. However this one does not have a template.
- This is a remote with a flash pulse. It is entirely disposable and can be used to Discover the impersonator. It also has a Repeater, so if the impersonator reveals and breaks stealth nearby, hackers can spotlight it.
From this image we can see that if the impersonator moves to the right it has to first navigate around the Camouflage markers, whilst facing lots of Discover AROs. It will then meet a lot of template weapons which severely threaten it. The impersonator can instead choose to move left with far less resistance, but there is still a remote with Total Reaction watching this path, and if it tries to go after any targets it will most likely trigger a nearby Mine and/or Crazy Koala.
Conclusion
Impersonators are incredibly strong and can be used to devastating effect. A careful push with an impersonator can see it taking out key targets without the opponent being able to do anything about it. This is particularly true if smoke grenades are used cleverly. However, on the other hand, counterplay to Impersonation does exist. Shutting down an impersonator’s mobility by simply placing troops in its way is a very effective strategy. If an impersonator is placed in a corner, you may be able to trap it entirely so it literally cannot move without first clearing the models that are trapping it. Furthermore, placing templates and mines near to your vulnerable troops will make it more difficult for the impersonator to score a kill without it dying in return. In these cases, you force the impersonator to either throw smoke (which means it’s wasting orders not killing things!), or to approach an altogether different target.

Thank you very much for this article ! As a beginner, I often use your website for reference. It is so nice to see that you are still playing and posting !
LikeLike
Cheers that was great.
LikeLike